

Summer to me means new skirts. I like wearing skirts in the warm weather as much as I love wearing cardigans in the cooler weather – a lot.
Usually, I buy a new skirt from Boden at the beginning of spring. The prints are really fun, they’re well made and they’re lined, which wasn’t a feature I was looking for at first but now don’t want to give up. But there really is an end to most things. This year I wasn’t thrilled with the print choices of Boden’s A-line skirts so I knew I would have to make all my skirts.
Skirts are one of the easiest garments to sew and fit. However finding a pattern for a lined skirt is almost impossible (except maybe a style designed for wool and as part of a tailored suit).
Why would I want a lined summer skirt? Duh, they look so much better. They drape nice, they wear longer, and you never have to think about the bright sun shining through your skirt making shadow puppets out of your legs. (Now, not all summer skirts would look better lined. A casual, drawstring linen skirt would not, for instance, or a flowy, full, skirt either)
Here is how I made a lining pattern for my skirt. It really is easy.
The lining layer can be made from batiste, cotton lawn or, as I did here, a lightweight unbleached muslin.
This skirt pattern is from the book “Sew Serendipity” by Kay Whitt. I have seen it used at my local used bookstore and, of course, try the library. You could use just about any skirt pattern for these directions.
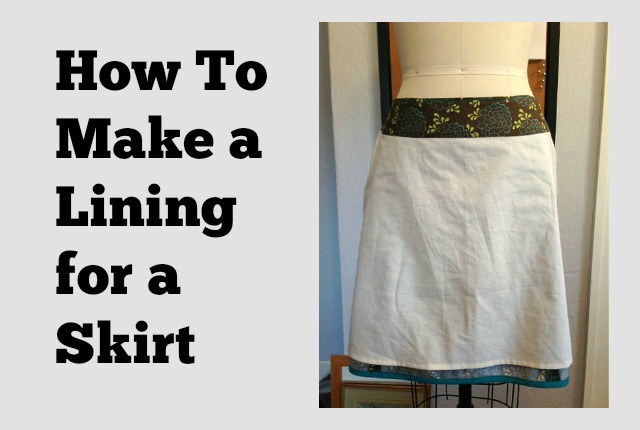
The skirt I’m showing, and lining here is actually a “muslin” for fit. Because it fits well I decided to take it apart and make a lining for it so I could wear it. When it works out that your muslin becomes wearable, well, that’s a good day. Usually a rare day, but a good one.
This skirt is made of six panels. The center back panel of the skirt is actually two pieces to accommodate a zipper closure on the center back seam. Therefore this skirt is actually seven panels. I am making the lining with three pieces; one front piece and two back pieces. The lining will have two side seams and a center back seam.

Lay the skirt back or front (both will have to be done) onto paper that is larger than the skirt. Note the center back panel and the side back panel are already sewn together. Again, I’m making my lining in fewer panels than the skirt.

The lining will be sewn to the lower edge of the facing, not into the waist seam. Lay the corresponding facing pattern piece on top of the skirt and line up the edges.
If your skirt has a waistband you can use your skirt front and skirt back pattern pieces to cut a lining out. Then sew the lining panels together and catch into the waistband seam when attaching the waistband to the skirt. The pattern for the lining will be the length of the skirt minus the facing.
The pattern for the lining will be the length of the skirt minus the facing plus a little shorter at the hem so it doesn’t peek out.

Place transfer paper under the skirt, transfer side down, and trace over the facing’s lower edge seam line – not the cutting line. This will also be the seam line for the upper edge of the lining.

Moving around all the edges of the skirt, trace off onto the paper.Since the seam allowance is included on your skirt panel or skirt pattern piece you will trace around the outside of the skirt (or pattern piece) not the seam line. Doing this means the seam allowance is already included in your lining pattern, the traced pattern.
Since the seam allowance is included on your skirt panel or skirt pattern piece you will trace around the outside of the skirt (or pattern piece) not the seam line. Doing this means the seam allowance is already included in your lining pattern, the traced pattern.

Most of us don’t like it when the lining peeps out under the skirt so trace and mark the paper one inch above the skirt’s lower edge. An easy way to do this is to place a see-through ruler one inch into the skirt and use it to guide the tracing wheel. You’ll need to move the ruler to follow the curve of the lower edge.

When you have completed tracing the skirt the skirt onto the paper, lay it aside. Time for the pattern making.
Add a half inch seam allowance (or whatever amount your skirt pattern seam allowance is using) to the top edge. Remember, this edge is going to be sewn to the bottom of the facing piece.
If you traced the outer edge of your skirt or pattern piece the seam allowance for the sides and hem will already be included in your tracing.
Repeat the above steps to make the other lining pattern, the front if you just made the back or the back if you made the front.

Label you new pattern pieces. You want to include the grain line (which will follow the grainline of your skirt, usually waist to hem), the name of pattern if applicable (like Butterick #5555), what it is (back lining or front lining), how many to cut (cut 1 for the front or cut 2 for the back or cut 1 on fold), what to cut it out of if other than the garment fabric (lining fabric, interfacing, etc), and what your seam allowance is (SA 5/8″ or SA 1/2″). If sewing for someone else include their name and size and date.

Pattern making done. Sewing starts.
Cut out your lining pieces.
Sew the lower edge of the skirt front facing to the top edge of the skirt front lining.

Iron your stitches in the opposite direction that you sewed them with the two pieces still laid face to face. Then open up the facing and the lining, clip the seam allowance at the curves and press seam allowance toward facing. If the fabric pulls, clip into the seam allowance where it is pulling to release the tension.

Sew the back skirt facing pieces to the back skirt lining pieces. Iron and clip seam allowances just as you did to the front piece.

Edge stitch the lower edge of the facing, catching both layers of the seam allowance underneath.

Sew the center back seam from the marking where the bottom of the zipper lies, to the hem. Above the marking press the seam allowance back as if you had sewn it together. This will be hand stitch down around the zipper.
Sew the skirt lining front and a skirt lining back together at the side seams. Press the seams and press the seam allowances open.

Your skirt panels should be sewn together and the zipper in following the directions that came with your skirt pattern.
Pin the facing/lining to the skirt at the waist seam right sides touching, or face-to-face. Line up the side seams of the skirt and the facing and center fronts. Stitch together, iron the seam and then again opening up the seam allowance. Clip the seam allowance where needed.
NOTE: Wherever the fabric shows a little pull or won’t lay flat on the outside is a sign that the fabric in the seam allowance is under tension. Clipping to the stitch line – but not through the stitch line – will relieve that tension and let the garment lay flat and look beautiful.
Press the seam allowances toward the facing and edge stitch the facing near the waist seam catching all the layers of the seam allowance (as you did to the lining after attaching it to the facing) This edge stitching keeps the facing from creeping out of the top of the skirt.
Turn the facing/lining to the inside of the skirt. Press. Top stitch around the upper edge if desired. Topstitching is a very casual, sportswear detail. You will not want to use topstitching on every skirt but the design decision is all yours to make.
Hem the lining by turning the raw edge in under itself and stitching it down by machine. Machine stitching is fine here, it’s the lining.

Voila! It looks almost as good inside out.
If you have any questions on making a lining for your skirt, please let me know.
Oh, and here is the skirt right side out;

I used a bias band to encase the skirt hem because I didn’t have enough length to hem it. (Remember, it was a fit muslin before it became a “real” skirt 😉
Great post! Thank you! We would like to see the skirt right-side out too sometime.
Thanks!
Hello,
I’m happy you liked the post. I’ve uploaded a photo of the skirt right side out (worn and washed many times now so it has relaxed) and the skirt I made the brown skirt as a “test” or “muslin” for. The pattern was from the book “Sew Serendipity”. I haven’t worn the blue skirt yet. I’m not confident I’m a ruffle type of girl. It’s lined too, of course.
Happy sewing,
-Mary
Thanks so much! Wonderful job and great written and visual detail.
Thanks for the feedback. I hope it was helpful and that all your skirts are now lined 😉 Not really, that’s too much work.
Hi! Thx for the lesson. It’s just what I was looking for. I am making a summer cotton skirt (sew serendipity Emiline) that gathers at a yolk. How do I line it? With an A line lining? Thx again!
Hello Janet,
I would cut from a lining fabric (a cotton lawn in a color that goes with your skirt or a thin muslin) another skirt front and skirt back. You can sew the lining together at the side seams, gather the top and insert into the yoke and yoke facing with the skirt but I think it would lay flatter at the gathers if you basted the lining pieces to the skirt pieces at the top (the seam that goes into the yoke) Maybe baste them together with the gathering stitch. The side seams of the lining can be sewn in with the side seams of the skirt or sewn separately so the lining hangs loose.
Also I would make the lining an inch or so shorter then the skirt so it never “peek-a-boos” out from under the hem.
Do you think this approach might work? I’m just thinking off the top of my head. If it’s more complicated, or if I’m picturing it all wrong feel free to send me a picture. I love these kind of puzzles (I also like Sudoku).
Hope it helps and thanks for reading the blog.
Mary
Hi! Thx for your quick reply! I think it will work. I will stitch the sides to the skirt, and separately stitch the sides to the lining. Then I’ll pin, baste and gather the skirt and lining together (like 2 tubes) as one piece. Then I’ll attach to the yoke. Then I guess the zipper goes in after that, would you think?
I think you have a good plan.
Many times the lining/facing is flipped out where it attaches at the waist and the zipper is first sewn only to the outer skirt. Then the lining is flipped back into the skirt. The lining’s seam allowance around the zipper is folded under and the lining is hand basted to the back of the zipper tape making it all tidy around the zipper.
If your skirt has a deep yolk where the zipper is then your zipper is sandwiched between the yolk and the yolk facing, which would make your lining method super easy and the way to go for sure.
I don’t think you’ll have any problems figuring out the zipper. If you haven’t already, read all the way through the pattern instructions before you go further just in case there are surprises up ahead.
-Mary
after nearly breaking my head trying to work out how to attach the facing to the lining on a skirt I am sewing (the instructions are poor), I found your tutorial. Thanks so much! Now I got it and I can carry on with my skirt.
Really glad you found the post helpful and congratulations on getting your skirt closer to wearable.