

It Starts With Envy:
Up until recently, my sewing supplies were semi-organized in drawers, and bins, and shelves and I was content. Sure things would hide in the back of the drawer, slip down to the bottom of the bin, or fall off the shelf. That’s just how the world works, a little natural disorganization, right?
Then my husband took his tools out of the drawers, and bins and shelves they were in and put them on a pegboard. Suddenly you could find the hammer or the screwdriver, even the painter’s tape by just flipping on the light switch. There it was. And of course, you could also easily put everything back when you were done so the next time you could find what you needed with no problem.
I want that too.
Images of craft room pegboards on Pinterest didn’t strike envy in me like seeing one in action. If you’re unsure a pegboard could work for you, or if you’re thinking about getting one but haven’t quite made the commitment here are some ideas for customizing it, things to think about when installing one and the many ways a pegboard could hold all your treasures, at the ready.
The Look:
 The humble brown masonite pegboard has a rustic, throwback-to-my-childhood charm about it that I appreciate but, it’s not like me to keep something simple when I can make it complicated. I thought about painting it but was indecisive about color; white, metallic, the wall color? Or perhaps put a frame around it like an old master’s painting. Even better, cover it in fabric.
The obvious obstacle to this is the fabric covers the holes.
And the obvious reason to use fabric is that it covers the holes.
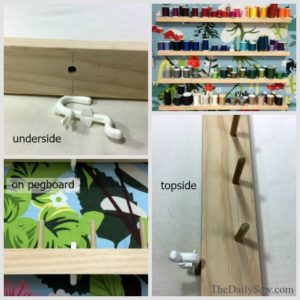
Some spray adhesive and an old piece of Ikea upholstery canvas later….
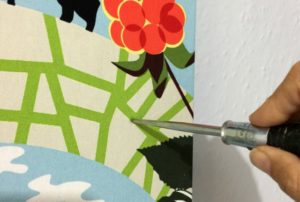 Wait? What?…how does this work? The fabric disguises the peg board but allows you to feel where the holes are so you can easily puncture it with an awl where you want a peg to go in.
However, you’ll want to plan where you’ll put objects and the hooks that hold them before you glue the fabric to the board. I do have a couple of holes where I’ve moved some hooks. They get a little lost in the print of the fabric but they do show. If this is really going to bother you, don’t cover your pegboard in fabric.
The Practical Bits:
Masonite pegboard comes in 4′ by 8′, 4′ by 4′, and 2′ x 4′ sheets. We hung two pieces of 4′ x 4′ pegboard, side by side because we already had one 4′ x 4′ sheet. (The second piece was cut down to 4′ x 3′).
Pegboard needs to be mounted off of the wall slightly in order for the pegs to go through the holes in the board. Simply screw a 1″ x 3″ strip of lumber to the wall at the height you want the top of the pegboard and another strip where the bottom of the pegboard will be and one in the middle if your pegboard is taller than 3′.
The strip in the middle helps prevent the board from sagging and bending in, toward the wall as time, and the weight of the items on it will have it do.
Then screw the pegboard to the wooden strips.
If the pegboard is to be above your work area you’ll want to place it higher than your work surface. If the board comes all the way down to the work surface, items on the work top, like your sewing machine, or books, will obstruct the pegboard. However, the placement of your pegboard is determined on the space you have and the look you want.
The Pegs:
The first pegboards, in the history of pegboards, must have had straight pegs stuck into the holes. Any object with a hole or one that could drape over a peg could go on the board. Welcome to the future, my friends, now you can place, up on your board, almost anything thanks to the massive variety of hooks, and hangers, and pegboard accessories.
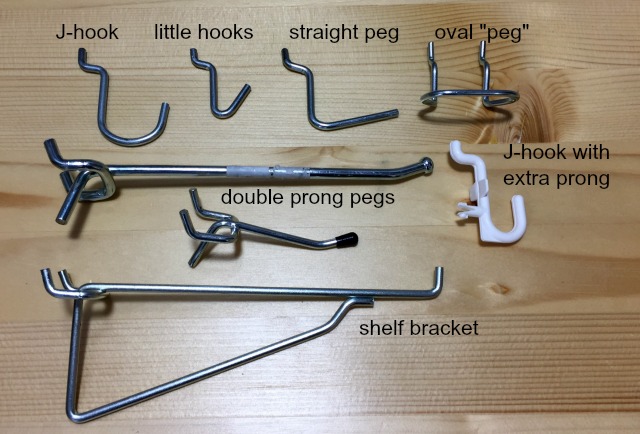
I bought an assorted sampler pack of hooks and pegs to get started and these are the pegs I used.
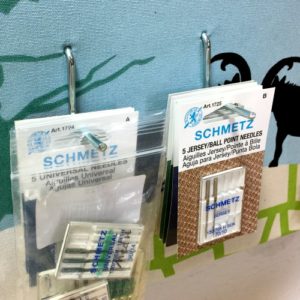 The simple straight short peg: This is a straight basic peg on which you can drape or hang an item on to. I use it for items I’m constantly grabbing because they slide right off. For example, machine needles. I have different size and type needles on one hook. I take them all off and shuffle through the stack to find what I need.
 The J-hook: Objects on a J-hook rest in the lowest part of the hook making them stay on the hook better than the straight peg. But the item can also bring the hook with it when you take it off the board. The hooks come with little plastic bars that hold them down against the board but talk about cluttered looking. So I use the J-hooks for items I don’t need constantly.
Another option is to use the double stack pronged J-hook. They don’t leave the pegboard. (The white plastic double prong J-hooks were purchased through Amazon. I use them to hold the spool shelves)
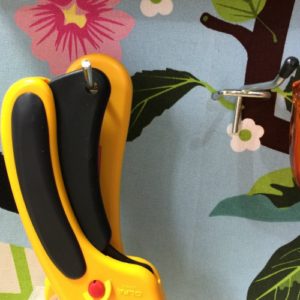 The double prong peg: Like the simple straight peg this is pretty basic and very handy but it has two side by side hooks which makes it stronger for heavier items and keeps the hook in place, on the board when you take objects off of it.
They’re great for scissors and other items you’re frequently grabbing for. You can remove the black plastic safety cap from the end so items with a small hole, like the rotary cutter, can slip on and off of it.
 This shape peg comes in a variety of lengths. The longer pegs are also thicker for heavier items. Hang the long pegs up high where you won’t bump your head into them, they stick out pretty far, and where they won’t obscure your reach for items above them.
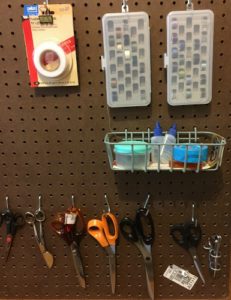
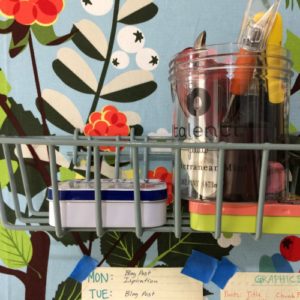 The wire basket: These baskets have two hooks and are made for pegboards. They’re a little pricey but pretty handy. The wire grid of the baskets let you see what’s in them which is especially useful if hung up higher than eye level. The grid is pretty large though so items can fall out. To prevent this you could line the basket with cardstock or a fabric liner, but these will obstruct your view to what they hold.
They’re great for small containers holding even smaller items like mint tins for safety pins, little plastic containers for snaps, old teacups for thimbles, and Talenti gelato containers for just about anything. (I’m thinking of making a sacrifice and eating more Talenti gelato so I can have more containers. OK, I might want the gelato more than I need containers but it is pretty genius of them to make clear, sturdy, screw on lid containers. What crafty person doesn’t say to themselves, I can use this for something?)
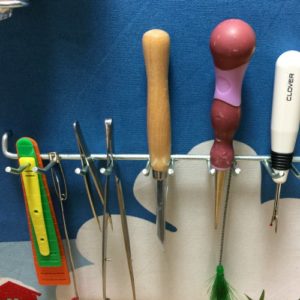 A muti-prong tool holder: Objects, with large handles but no holes can rest, peacefully, on these prongs. Great for serger tweezers, an awl, seam rippers and strips of stabilizer when you’re using them.
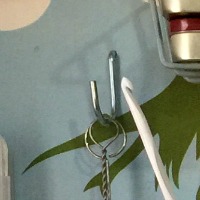
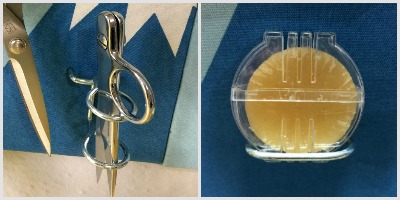 The double ring and the oval: These are also for items without holes. They came in the assorted peg pack and I didn’t think I would use them. After playing around I realized the snips like resting in the double rings and the oval was made to hold beeswax.
Shelf holder pegs: A set of these pegs are also included in the assorted peg pack. Together they hold a narrow shelf for small stacks of items, glue bottles, or for large serger thread cones. I haven’t used these pegs yet but I’m thinking about it. I have a tendency to fill a shelf too tight making it easy to accidently knock neighboring items off when reaching for something.
The Extras
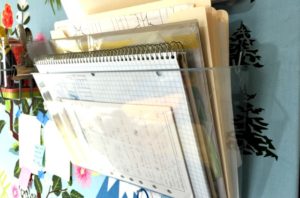 Wall pockets: These hang from little hooks and are perfect for loose paper, notebooks, and files. You can buy wall pockets at an office supply store.
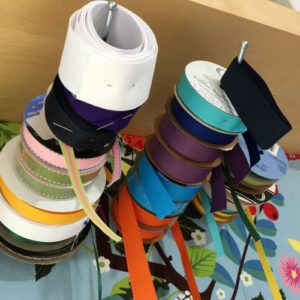
 Spool shelves: You could hang a ready made spool rack on your pegboard or a simple system like the one we made ourselves.
What else could go on a pegboard in your sewing area?
- Rulers, of course
- Press cloths with a loop sewn on them
- A tripod, remote and other camera supplies that have corded loops
- Fabric wall baskets and pails to hold little things
- A wall storage system with a rod and S-hooks (Ikea has a bunch)
- A magnetic knife rack for scissors, metal bobbins, other metal tools.
- A magnetic spice rack. The spice containers hold small notions and tools
- A sheet of metal to hold small containers onto which you glued magnets
- A paper towel holder with a dowel to hold ribbons
- Artist clamps and large binder clips can hold many items giving them a hole from which to hang.
- A framed or unframed print or photo
Hang It Up
Wall space is underutilized they say. If you have some, consider putting up a pegboard. Your board can be as small or as large as you desire. It can be decorated and personalized, made a focal point of the room or mounted behind the door. When your tools and notions are up on the wall they are easy to find, easy to see what you already have, and easy to get to.
You’ll never regret making your sewing time more about sewing and less about finding things.
Really helpful post about organising a sewing pegboard! Thanks Mary : )
Thanks. I liked my red cabinet drawer but I really, really like the pegboard. I’ve had to tweak the placement of some things which would be a breeze if I hadn’t covered it in fabric 😉 But, all in all, if you have some space for a pegboard I recommend it.
I haven’t got the space to not have a pegboard! 😀 Have been thinking about it for a while but couldn’t think how to organise one with all the different pegs etc., until I found your post : )
😊. Did I mention you can get some of the hooks &pegs on Amazon? In case your local store doesn’t have what you want.
Yes, I have had some (a mixed pack) in my basket there for a while now, just waiting for me to find your post! 😀
Not all of my rulers have holes. How can I hang up those which don’t?
Some of mine don’t either. The smaller rulers I keep standing upright in an old beer stein on my table. The larger rulers without holes are balanced on two pegs. The pegs are “J” shaped and they are about 16″ apart from each other but at the same height up from the bottom of the board. The ruler then rest in these two hooks (It’s a 24″ ruler).