

A reader asked “On a commercial pattern I have decreased the size of my armhole on a blouse pattern. I took 1 inch out of the front armhole. How do I adjust the sleeve pattern?”
I assumed the problem was a gaping armhole – too much fabric above the bust area. This usually occurs when the shoulders are narrow and the bust full.
I checked all my books and this is what I found out:
For a small adjustment, padding could be added to the shoulder to lift the armhole while making the shoulders appear less narrow. This method would be a particularly good solution for heavier garments like coats and jackets. You could use larger shoulder padding for larger adjustments you just want it to retain a natural, well-balanced, body shape.
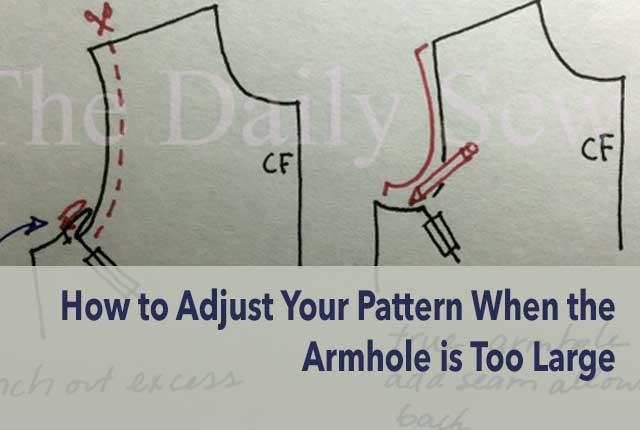
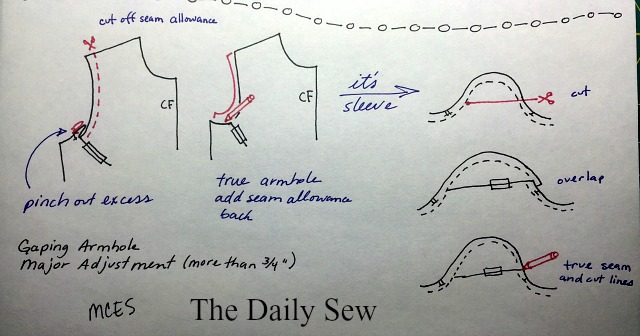
When adjusting commercial patterns remember the outside line is the cutting line, not the seam line. To get it out of my way, I cut the seam allowance off in the area I need to make alterations to. At the least, I draw in the seam line. No need making adjustments to seam allowance and it gets in the way when you need to true or redraft the seam line. After making the adjustments I add seam allowance back by taping strips of tissue paper on the edge of my adjusted pattern and drawing the seam allowance on. Or you could add it back on when you cut the pattern out.
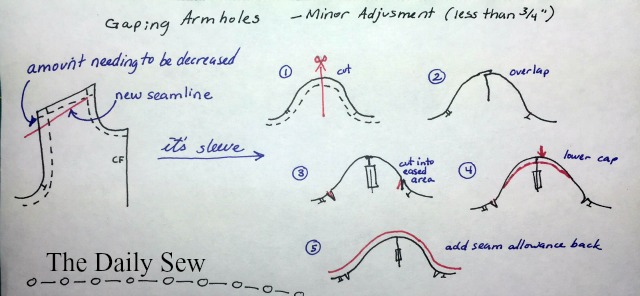
There are two ways to take out the excess fabric from the bodice front pattern. The first one listed is for taking out ¾” (2 cm) or less from the front of the bodice and the second method is for an adjustment larger than ¾” (2 cm). How to adjust their sleeve patterns follows.
For a minor adjustment take out the excess from the shoulder by lowering the shoulder seam line on the front bodice only. Lower the shoulder seam your desired amount at the armhole and taper to the original shoulder at the neckline.
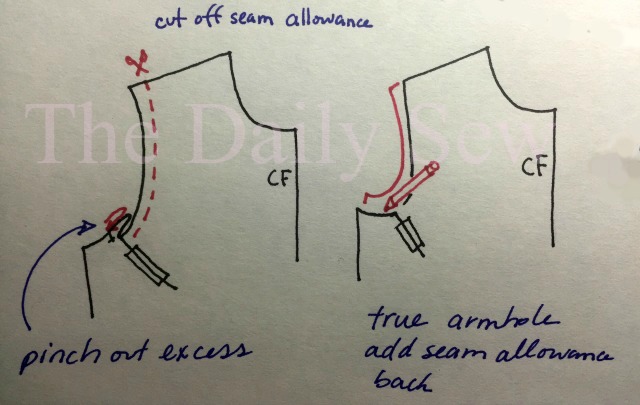
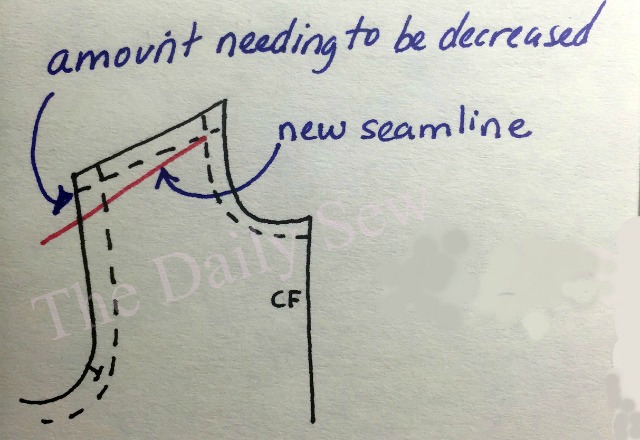
For a major adjustment pinch and pin out the excess fabric into a dart in the front armhole. Mark, fold out and tape the dart down on your pattern. Redraw (true-up) the armhole on the seam line. You may want to cut the seam allowance off, before folding out the dart and truing up the seam line (just add it back at before or while you cut out your fabric)
To adjust the sleeve pattern
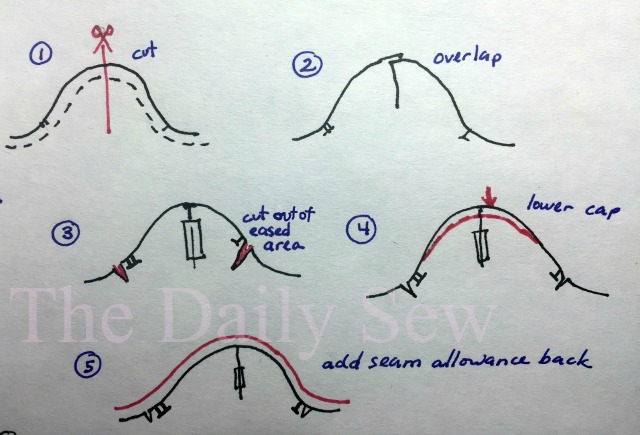
For the minor adjustment, many sleeves will not need altering instead the excess fabric in the sleeve can be eased into the armhole. However, if there is too much sleeve or the fabric does not ease well cut a vertical line down the sleeve at the top about 3 to 4 inches.
Lap the edges the amount to be decreased and tape down.
Should the tissue pattern bulge when laid flat cut 1 ½” inches down into the sleeve beyond the notches (outside the eased area of the sleeve cap) to release the tissue paper.
Redraw the sleeve cap slightly lower (follow the curve of the cap).
Adjust the seam allowance/cutting line.

For the major adjustment measure the armhole* and the sleeve cap between the notches.
The sleeve cap (for a set in sleeve) must always have a little ease. Meaning the measurement between the notches on the sleeve will be larger than the measurement between the notches on the armhole.
If your measurements indicate the sleeve ease is less than 1 ½” you have the option to ease the excess into the armhole (it will depend on the style of the blouse).
If your measurements indicate the sleeve ease is more than 1 ½” cut the sleeve pattern horizontally across the cap from the front of the sleeve to, but not through, the back of the sleeve (since you reduced the armhole in the front only, you do not adjust the sleeve in the back).
Lap the edges of the sleeve front the amount removed from the bodice armhole and tape down the pattern.
True the seam line and add seam allowance.
* When measuring the armhole between the notches do not measure the shoulder seam allowance (it’s easy to do when your seam allowance is included and not marked on your pattern)
Make a muslin before cutting into your fashion fabric.
I hope this has helped. Thanks for your question.

Thanks for posting. This is valuable.
Thanks, I’m really glad you found it to be so.
This is amazing and soo helpful. Thank you (Just what I needed now)
Thanks. I’m glad it could help. Fitting is so hard and so important.
Thanks for showing your steps clearly. This may be a daft question, but why do you only shorten the arm hole in the front of the pattern?
Ah, that’s actually a good question. In this case, the reader who asked for help had an armhole that was gaping armhole in the front only. She had too much fabric above the bust area which usually occurs when the shoulders are narrow and the bust full. The back of the armhole fit her fine. She only needed to adjust the front.
When it comes to fitting it’s helpful to see the body “divided” into quadrants. The back and the front, the right and the left. What you need to do to fit one area isn’t always going to affect the other quadrants. Sometimes it does, but not always.
I’m glad you found the steps clear. Thanks for reading the blog
Excellent explanation and drawings. I have not seen the major adjustment of the sleeve head pattern done that way before but it makes perfect sense. Thank you.
You’re welcome and thanks 😉
This was really helpful, one those questions that you have but no one answers! the drawings were perfect for me.
Thank you. I’m glad it was helpful
Thank you – exactly the information I needed, and you explained it very clearly 🙂
Thanks. I’m glad you found what you needed. I know that’s such a great feeling when that happens to me.
I’ve been looking for this alteration for years. I have large bust and small shoulders so fba in dresses practiced many times but have to do in sleeveless items as could never alter sleeve properly. I thought I had to rebalance something. Will definitely try this. Thank you so much. 😊😊😊
I hope it works. I have a friend with the same fitting problems. It’s really hard to figure out. Do you go with the size that fits your shoulders and then adjust for the bust? I’m curious also if you have found one pattern brand that fits you better than the others.
This is amazing as it’s almost impossible to find anything explaining adjusting the sleeve as well. I am petite and have just made my first ever sweatshirt. I have a lot of excess fabric around the back armpit area. Will this method help rectify the problem? I am a beginner and new to fitting issues etc. I have managed to make a narrow shoulder adjustment and love the overall fit otherwise. Many thanks in advance.
Too much fabric under the arms in the back suggests you have a narrow back – but not necessarily narrow shoulders. Do you notice the garment is looser than it was designed to be from the bottom of the arms to the waist area? If so that is a narrow back and the fix for that is a little different. The quick and dirty way to fit a narrow back is to take some excess out at the center back. If the pattern has you line up the center back on the fold just scooch the pattern off the fold a tiny bit (like 1/8″ because it’s folded that’s taking out 1/4″). This changes the neck size as well so if you have a collar or neckband either draft back in what you took out starting 2 -3 inches below the neckline or take the same amount out of the neckband, neck facing, etc. (I should do this as a post) If it’s a 2-piece back – a right and a left – you can also subtract a little out of center back or just sew with a wider seam allowance between the waist and the upper back. You may also need to shorten the pattern (horizontally) in that armpit to waist area.
Fitting is tough. It all comes down to figuring out what exactly is the difference between the body you are fitting and the pattern (and different companies draft for different bodies so it can change from one pattern company to another). I mean, are my shoulders narrow, average or wide? Where is the size chart that tells me how I compare? So, knowing you’re petite is a huge help. Then, what are some other typical petite body fitting adjustments? And then what fitting adjustments for your particular body? I have a petite friend who also has a broad back and a large chest. I am 5’7″ but a petite top size fits me better than an average size (I have to lengthen the sleeves 😉 ) You will discover more of these little things as you sew more. A good, basic fitting book is Nacy Zieman’s “Pattern Fitting with Confidence”
You might want to search on IG for #petitesewing and #petitesewist. A lot of sewists will tell you what fitting adjustments they had to make for a particular pattern. Also Sinclair Patterns and the paper Burda patterns draft petite sizes. My petite sewing friend has a site talking about her fitting challenges – here it is: http://www.minimaedelcreates.com/
Let me know if you have any more questions and happy travels on your sewing journey! It is fun to make your own clothes – or at least it’s fun to Wear clothes you made 😉
Thank you so much, you explain it clearly.
Thank you
I read somewhere, was it in a Palmer-Plesch book?, that adjustments in which I cut into the pattern such as in an armhole or back crotch or neckline are best done at a straight area and not in a curved area. I have very limited fitting experince and have not personally tested this rule however it makes sense that cutting into a curved area means changing the direction of the grainline in unpredictable ways because it’s on the bias.
That’s a good general rule because, yes, you’re messing with the grainline when adjusting curves. But sometimes, the curve itself just isn’t right for the fit you need. Taking excess fabric out as a dart at the armhole is especially helpful if you have a small upper rib cage. And for pants fitting scooping out the crotch curve is pretty common. The more I learn about fitting the more I see there are a few ways to do any one adjustment. Everybody has their method it seems and I end up consulting 5 different books until I find a method I understand ;-).
Thank you so much for this tutorial!! I have been having major problems with front armhole gaping. I have a question about the second way of fixing this issue where you fold out the dart. Are you just folding out that armhole gaping in a dart shape and then transferring the new armhole shape to your front bodice? Is that the only change you are making or are you adding the dart you folded out to your front bodice? Thank you.
Hi Rachel, I’m sorry not to have seen this comment earlier and am glad you emailed me directly about it. But yes, that is what I was doing – pinching it out and then transferring the new armhole shape to the pattern. As we discussed in the email I now think a better approach, when there is a lot of gaping, is to sew up a smaller size – a size that fits the upper chest – and then do a full bust adjustment to that bodice piece. I believe the gaping comes from too much fabric in the upper chest. Sometimes the pattern could be drafted odd and it’s to blame but usually it’s because we pick a size that fits our bust (as we were all taught and told) but if our bust is a D cup or larger, and our rib cage is small-ish than we are left with too much fabric above the bust. Better to start with a size that fits the smallest part of our torsos (for tops, jackets and dresses) and then add width in the bust or waist or hips if needed. Much easier than altering the shoulders or an armhole.