

Turns out I need to relax more. At first, I thought this meant days poolside however I have no pool and it turns out a day of doing nothing only brings on more stress for some of us.
What I need, so suggested the doc, is to relax a little every day and practice not getting stressed about minor things in the first place. What I need, she prescribed, is to focus on my breath, for five minutes, five times a day.
What becomes clear in the first minute is it isn’t that easy (yet) and it’s near impossible if you are uncomfortable because discomfort trumps breath when it comes to focus.
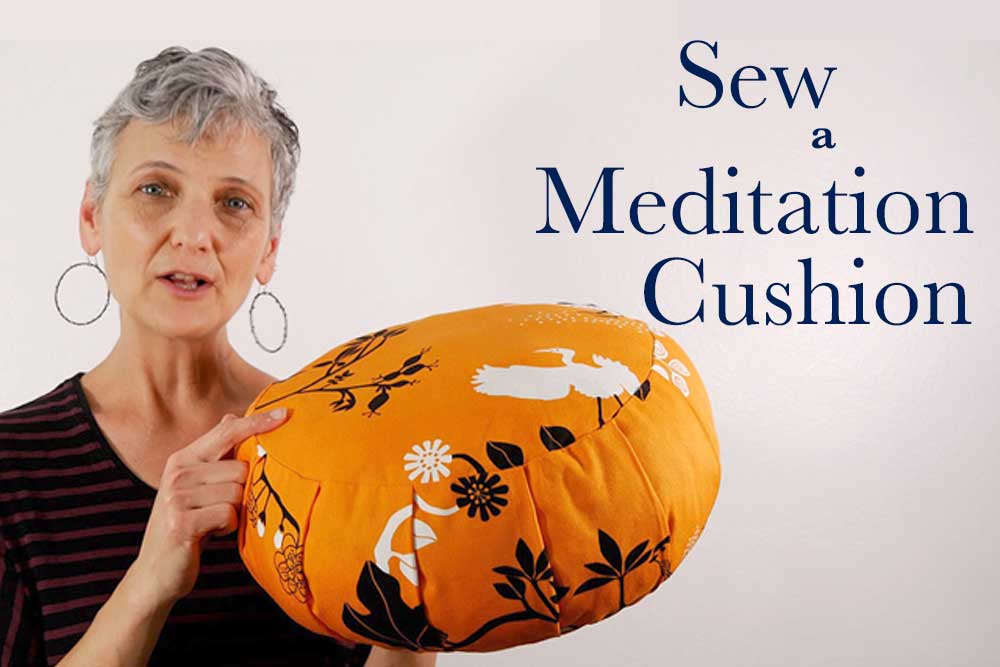
And this is why they have a cushion just for meditation: right size, right height, right firmness.
And hey, some aren’t that expensive but…why can’t I make my own? (You know, it’s all about reducing my stress so I’m going to make it into a project, that I film 😉 )(This is becoming enlightening)
But yes, you can make your own meditation cushion.
It’s easy, almost super easy and it’s quick. It doesn’t require much fabric and you could use scraps to piece the pieces or a different fabric for each piece. The hardest and most expensive part is the stuffing. Whatever you choose to stuff your cushion with you’ll need a lot of it.
Watch This Video for the How-To:
Better made zafus (A meditation cushion is called a zafu) are stuffed with Kapok or Buckwheat Hulls. Kapok is environmentally very friendly (no pesticides and sustainable). Buckwheat hulls are dense to provide firm support.
You can also use what you have on hand, as I did. A mixture of cotton batting scraps, leftover polyfill, fabric scraps plus old t-shirts and foam packaging sheets.
As a quick reference here are the basic steps. For full details please watch the video.
- Cut two 12 to 14 inches ( 30 to 35 cms) in diameter circles for the top and bottom. Add a 1/2 inch ( 1 or 2 cms – your preference) seam allowance.
- Cut a strip 6 to 9 inches (15 to 23 cms) tall and 59 inches (150 cms) long/wide for the side. Add the same amount of seam allowance as you did on the circles.
- The side piece of a meditation cushion is pleated. Make the pleat marks first across the top edge then transfer to the lower edge. Mark on the wrong side of the fabric. Measure 6.5 inches (16.5 cms) in from the left. Then measure over 1.5 inches (a shy 4 cms), mark. Then measure over 3 inches (7.5 cms), mark. Repeat 1.5 inches, 3 inches the entire length of the top edge until you have about 6 inches (15 cms) or so left.
- Fold your pleats by matching the first mark to the second mark (1.5 inches or 4 cms away) and pin them down. Baste the pleats in place.
- Starting in the center of the side piece pin the top piece to the side piece lining up the raw edges. Pin in one direction until you have about 5 inches (12.5 cms) of side left. Leave that unpinned. Start pinning the top in the other direction until you have about 5 inches (12.5 cms) left.
- Looking at the direction of your pleats decide which end of the side will overlap the other end. The end that overlaps is pinned to the top first. The end being overlapped will be pinned down second.
- Sew the top to the side piece all the way around.
- Pin the bottom to the side piece as you did the top.
- Sew the bottom to the side piece all the way around.
- Stuff the cushion through the opening made by the overlap.
- Hand stitch the opening/overlap closed
Thank-you for this helpful video! I made a meditation cushion this morning based on your design, and it turned out great. 🙂
I omitted the pleats on the side as I wanted a cushion that stays taller without bulging sideways. I also added a strip of fabric to the side as a carrying handle. I stuffed it with polystyrene micro-beads from an old pillow – they make a huge mess! but make for a comfortable cushion.
Thank-you again for creating and posting this video. It was just what I needed to make the cushion I wanted. I’m looking forward to trying it in meditation this evening!
I’m glad you found the post helpful. Those are great ideas – all of them! My cushion does bulge out at the sides. Using stuffing beads from an old pillow (I can’t imagine the mess 😉 is clever. I bet it is comfortable. I’m wondering if my kids left any such type of pillow in our attic… hmmm. And a handle is just smart. This is what I love about making things yourself – customizing to suit your needs and your supplies. Thanks for letting us know 🙂
I literally never leave comments but felt I need to thank you. This was a first ever sewing adventure. I don’t own a sewing machine and had to go buy pins plus thread and fabric to make this. And even though I didn’t put a seam allowance and hand stitched everything, watching your video helped make the finished product turn out perfectly. Thank you for your very clear directions!
(P.S. your contact form is not working)
I’m so happy you found the video helpful. Maybe this is the beginning of more sewing adventures – I mean, you do own pins now 😉 (and thanks for the info about the contact form. I’m looking into that next)
Thank you for this awesome explanation of how to make a meditation cushion! I have been sewing for only a few months and everything was very clear. I made a cushion filled with buckwheat and a cushion cover with an added handle, as Gail mentioned above. I made it for my husband who loves to meditate outside so I wanted to be able to wash the cover from time to time. Both turned out great and I can’t wait to give it to my husband on his birthday next week.
A handle is a great idea! especially if the person needs to take it outside, or any distance. I’m so happy you liked the post. Thanks for letting me know
Awesome video-teaching is excellent. All steps explained so well!!!! Thank you as I will be making mine!!! A handle from the comments is a great idea when packed up for a Yoga class.
Thank you. A handle is a great idea.