
 If you’ve sewn more than a dozen patterns I bet this has happened to you. It’s completely frustrating and this time it’s not your sewing skills or lack of attention that caused it. It’s your commercial pattern. It wasn’t trued.
A true pattern is a pattern that all seams fit perfectly together as you would assume all finished, for purchase, patterns are. Well, sometimes, just like finding an editing error in a printed book, sometimes, a pattern you buy is not true. The side seams are not the same length or the waist band is smaller than the waist seam in the pants. It happens. It happens when we draft patterns and alter patterns and size them up or down. Only we never expect it to happen to a pattern we spent good money on.
The project I’m currently sewing had this problem. A simple six panel skirt which the panels don’t line up very well. Every panel has a swooped up hem at the seam so the finished skirt (sewn up just as the pattern was cut) would have a scalloped hem. No, this wasn’t a design feature.
When I finished sewing the skirt panels together I thought I had messed up. I started down a spiral of self doubt about my sewing skills. But wait, I didn’t mess up. The pattern must be goofy. I checked. Sure enough, the seams were off.
You shouldn’t have to check your pattern for mistakes like these especially since the retail price is more than most finished garments at Old Navy but you do. Check the major seams, like side seams and waist bands and some front facings depending on the style. The cheaper the pattern the more important to check. So check any pattern you get from a book featuring a lot of different sewing projects or a magazine or the budget line of a major pattern company.
Here’s how to check:

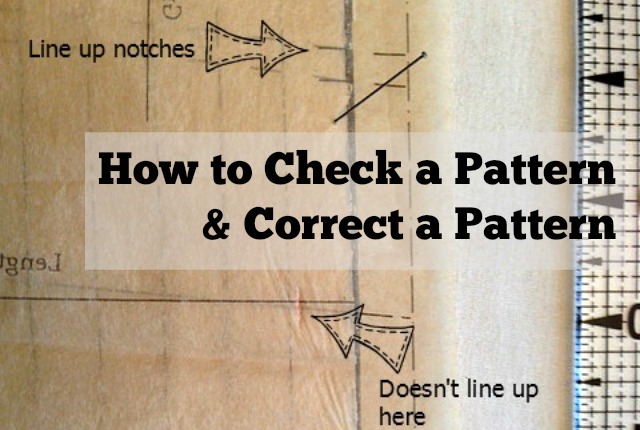
Place the pattern pieces on top of each other as if you were sewing them together. In the above photo I am placing the side back panel on top of the center back panel of a six panel skirt pattern. Obviously you can only check one seam at a time.
Line up any notches and “walk” the pattern down on top of the other pattern piece on the stitch line not the cutting line. There is 1/2 inch seam allowance on this pattern so I have to go in 1/2 inch from the cutting line. I marked the stitch line in red pencil but it is hard to see in the photo.
In the above photo, the notches are lined up, the second mark (where to cut for a short variation) does not line up and the third mark (where to cut for a little less short variation) does line up. But look below to see the hem.

The seam, by the time it gets to the hem, is off enough to really matter. It’s off slightly more than 1/8 inch. When you only have a 1/2 inch seam allowance that’s a lot to be off.
How do you fix it? Usually you split the difference between the two pieces. The shorter piece gets half the difference added to it and the longer piece is shortened by half the difference. In this case I just brought the shorter piece down to match the longer piece.
Down, up, what am I talking about? Well, I hate to break it to you but you have to redraw the pattern piece. Usually I just tape a scrape of pattern tissue to the pattern and draft the correction. Sometimes I’m tracing the pattern out completely for other reasons so I will corrected it on the new pattern I draft.

To check the correction or new pattern piece (I redrafted the skirt panels onto non woven interfacing, shown in the above photo). Once again, lay the pattern pieces on top of one another as if you are sewing them together. Match up the notches and then line up the seam allowances, not cutting lines. Pin together on the sewing line as if the pins are the stitches.

Fold the pattern back against the pins (just as if you had sewn that seam together and you are now opening the seam up to see it). Does it line up? Yes, you’re done. No, tweak a little more until it does match up. Use a French curve, hip ruler or ruler if needed to smooth any new sewing lines you had to draft when splitting the “off” difference between the two pattern pieces. Don’t forget to add your seam allowance on to the sewing line.
I get frustrated when a project takes longer than I expected and having to do extra steps always seems like a set back and a pain but it’s better to fix a problem or check for a potential problem up front instead of investing a lot of sewing time only to end up with a bad result. You know the cliche, “Measure twice, cut once”.
Having trouble with this pattern made me remember that I’m not the only one who runs up against this. I hope this has helped you have a better experience and a beautiful finished garment. Happy sewing.