
 Pressing as you sew is the key to a good-looking final project. How many times did our professors tell us this? Any time they could. After sewing any seam go to your iron and press that seam in the opposite direction from which it was sewn and then press the seam allowances open if possible. No matter what you are going to do with these seam allowances next it was pounded in to our class to press them open.
Pressing takes time, time away from sewing, but yes, it does make the final garment look better. To save a little time you can sew and press in groups. For example, stitch a few different seams or all the darts and then take them all to the ironing board at once and give them the press. This works in the beginning of constructing a garment; all those little pieces, before they get connected to one another.
Buy your pressing tools (or any type of tools really) according to your immediate needs and then start to acquire those extra items. This will save you money because you may realize you don’t need that extra tool or you could discover that sewing isn’t your thing and you’ll be glad not to have invested so much into it. (Of course, I’m joking. Everyone loves sewing)
The Basics:
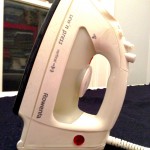 The Iron – The essential tool for pressing, wouldn’t you say? For sewing you want a steam iron, but one that can be used dry too. You want a wide range of heat settings to accommodate different fabrics. The extra features I would want in an iron would be a large reservoir for water (less refilling of the iron), concentrated steam vents at the pointed end of the sole plate, a spray feature, a cord that can move easily from where it is attached and I like an iron that has some heft to it. You can use a cheap iron as long as it has steam and the heating is even and consistent.
 The Ironing Board – Look for a board that is sturdy, level and can be adjusted to a height that is best for you. The surface should be smooth and you’ll want to keep it soil free. You can add more padding to a board with cotton batting (NOT polyester, it will melt under high heat). In lieu of a traditional ironing board you could pad and cover any sturdy surface. I use a door mounted on Ikea bookcases (photo, right. Use link for instructions). It’s large enough to press yardage on and I use it to lay and cut out fabric on. You can also make transportable ironing pads.
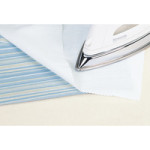
Press Cloths – A press cloth is a piece of fabric that comes between the iron and the project you’re working on. It’s used to protect your project from getting scorched and from the iron adding a shine to the fabric. Ideally you want a semi transparent press cloth (silk organza is a good choice) to see any details through and an all purpose cotton press cloth (I use muslin). Press cloths are not large, 12″ x 16″ would be plenty big. Using scraps of your project’s fabric is a good choice too. A press cloth is a must when applying fusibles, like fusible interfacing, to prevent any glue from getting on your iron. I have read to have a press cloth dedicated solely for use when applying fusibles and one side (with sharpie?) “This side up” and the other side “This side down” so glue will never get on the iron’s sole plate. (photo of press cloth from Nancy’s Notions)
OR Iron Cover – Used in place of a press cloth but not seen too much these days. The iron cover goes over the sole of the iron. They can be made from wool, canvas or a heat resistance fabric that is stretched over a metal frame.
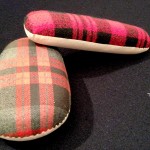
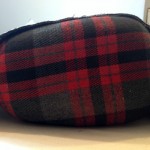 Tailor’s Ham – There is no substitute for the ham. It’s a tool you’ll want to have if you start making fitted women’s clothing. The tailor’s ham is an oblong, firmly stuffed cushion. It is used to press curved areas of garments; darts, princess seams, sleeve caps, collar rolls any place that requires a rounded, curved shape pressed in. Pressing a princess seam on a flat surface only leads to wrinkles. So why is half the ham covered in wool and half in cotton? The cotton side is for using with the highest heat settings and the wool side for lower settings.
The Next Level:
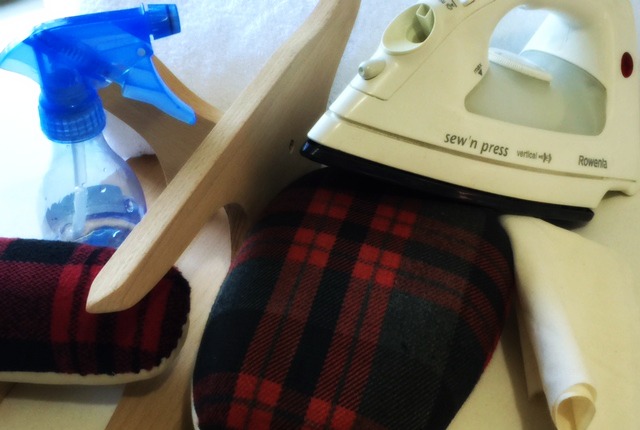
 Seam Roll – A long, firmly stuffed, tubular cushion with rounded ends. This is a great tool for pressing long seams open . Because it is narrow you press only the area you want, the surrounding fabric will drop down the sides. A firmly rolled up cotton towel could work in a pinch. (photo shows both the seam roll and the tailor’s ham)
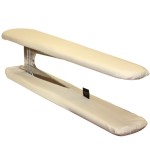 Sleeve Board – A sleeve board looks like two mini ironing boards placed one on top of the other, wrong sides together or it can be one mini ironing board on a stand. This tool makes pressing long, slim items, such as sleeves, easier. Sometimes you find these at thrift stores. The boards should be padded like a full size ironing board. (I use my seam roll and tailor’s board and do not own a sleeve board. If I ironed shirts after sewing them I might find this very useful for ironing the sleeves and collar)
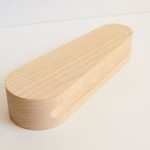
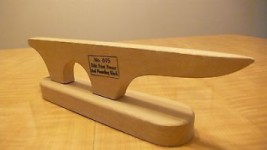 Point Presser – It took me awhile to acquire this tool but I’m glad I have one now. They do take up some space but if you sew garments frequently you’ll find it very useful. Shaped similar to an anvil but made of bare wood. The top edge is narrow and ends in a point. It’s the best for pressing open collar seams. The point of the point presser can get almost in to the tip of the collar. The point presser’s base can be used as a clapper (see below about the clapper).
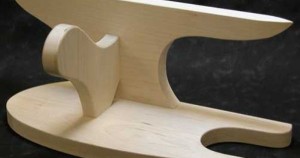 OR Tailor’s Board – The Tailor’s board is the point presser on steroids. It has the same edge and point as the point presser plus curves and other surfaces. The tailor’s board looks like a modern art sculpture. Three wooden pieces cut into different strange shapes and attached to each other in a way that it can be stood up in many different directions letting you use any of the many different curves and points. You can press open any small curve you might have with out ironing the surrounding fabric plus it has the same narrow points as the point presser.
 Clapper or Pounding block – The simplest of tools, the clapper is a smooth block of wood. It’s used to flatten seam edges by pounding it against the fabric while it is still hot from ironing the seam and creating a lot of steam. The amount of pressure you use while pounding will depend on the desired result. This tool is used mostly for woolens and linen, fabrics requiring a lot of heat and steam to manipulate. You could use a child’s building block or a seam roll as a substitute.
Dauber – A dauber is tightly rolled wool fabric used to apply water to your seam when you are pressing it open thus creating more steam right where you want it. It’s particularly handy for working with wool. The best thing about a dauber is you make it yourself from a scrap of wool. Here’s a video to show you how

Spray bottle – yep, a refillable spray bottle filled with water to spray water on cotton, linen and woolens to add extra steam. The steam gets the wrinkles out. Even though my iron has a spray feature, I find this indispensable when ironing yardage before I cut out a pattern. Using the spray feature on the iron means the iron’s water reserve is used quicker and I have to stop and refill it. The spray bottle fits under the faucet better than my iron. I also find misting a lightly wrinkled garment with water releases the wrinkles. I will press to no end when I sew but after the garment is made I detest ironing.
The Add Ons
 Press Mitt – Like an over stuffed oven mitt you can slip your hand in this and press the iron against it. It’s great for small, hard to reach places. (I do not own a press mitt. Sometimes I wish I did. Here’s a tutorial on how to make a press mitt. It’s also where the photo came from.)
Pressing Pad – The pressing pad is a thick pad usually made of three or four layers of soft fabric sewn together around the edge for pressing raised surfaces, for instance, sequined fabric and monograms. The raised surface is laid down, facing the pressing pad and the iron is used on the back of the fabric. A pressing pad is not the same as a portable ironing pad. The surface needs to be soft so as not the flatten the raised surface you are ironing the back of. I use a thick towel as a pressing pad when I need one.
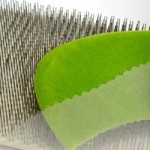 Needle Board – When pressing high pile fabrics like velvet you need a needle board to ensure you do not flatten the pile. The fabric is placed face down on the bed of needles. The pile falls in between the needles and the iron is placed on the back of the fabric. A needle board would also be useful when sewing highly textured woolens. I made a velvet dress once, in school and this was a must have. Now I don’t sew much in velvet but when I do I use a thick towel and and a lot of steam and finger pressing. I’m too scared to touch the iron the the fabric.
Any pressing questions? Tools I left out? Let me know. And remember that not pressing your seams as you go will make your project look home made – and not in a good way. Press, press, press.
This post is describe professorially.Most of the tools use in the ironing shop and commercially. Beside of this, it is informative post. Thank you for the post.
Thanks. Ironing and pressing are so important in sewing. It can make a huge (positive) difference in how the finished garment looks.