
It took me years to admit I love those canvas tote bags from LL Bean. Except I don’t really. I love the shape and the size. I love that they’re well made. I love that is an everyday practical item with a smart design to it. I just didn’t care for the color choices.
That’s easily remedied, isn’t it? Make your own.
But make it better, because you can make it to suit your own needs.
To get the pattern I started by measuring my son’s LL Bean tote for the size.
Anytime you copy a garment or bag you first need to analyze what’s going on with it.
- The tote bag has only two pieces for the bag even though it appears to have a bottom and sides.
- The sides and the bottom are combined with the front and back pieces.
- To get the height of the bag, lay the bag flat so it is basically folded in half. Measure from the top edge of the bag to the fold (middle of the “bottom”).
- To get the width measure from side seam to side seam.
I want my finished bag to be 15″ high with an 8″ wide bottom. To get that measurement you could take the desired height, 15″, and extend it by half the bottom width, 8″ is the full width. You end up with 20″ (15″ + 4″ + seam allowance) if you are cutting a front and a back separately.
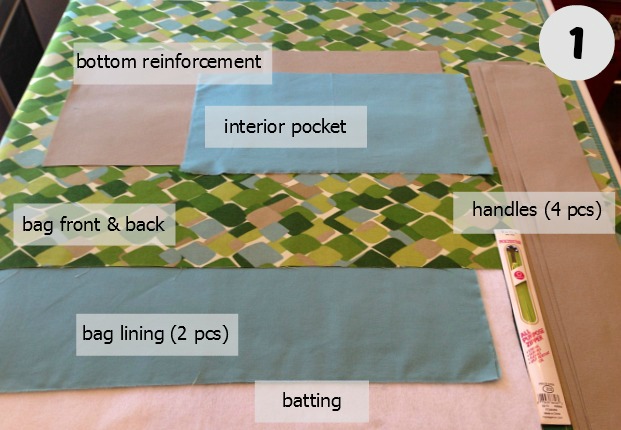
A list of the pieces I needed to cut and what size they would need to be.
Bag Exterior
Either one piece of a sturdy, heavy fabric, cut the width plus 1/2″ seam allowance on both sides by the height of the bag doubled plus 1/2″ seam allowance on both ends. OR cut as two pieces, the width of the bag plus the seam allowance on both ends by the height plus ½” seam allowance on both the bottom and top edge and sew the two pieces together across the bottom to make it one piece.
You definitely want to cut two pieces if your fabric has a nap (a one-directional print).
I cut the bag as one piece – connected at the bottom- because I had enough yardage and my fabric did not have a nap.
My LL Bean bag (my muse) is 15″ high, the sides are 7 1/2″ wide and the bottom is also 7 1/2″ (sides and bottom need to be the same for this rectangle shape). I cut the bag piece out of indoor/outdoor home dec fabric, 24″ wide and 39″ tall on the length grain line (or did I mess up and cut 38″? machts nichts, it turned out fine) Purchase 1 1/4 yards to cut the bag as one piece.
Bottom reinforcement piece
My exterior fabric isn’t super stiff and I would hate for it to wear out before it should so I added an additional bottom piece which I have seen done on totes from LL Bean and others. Besides, with my busy fabric I think the solid bottom will look good.
I used canvas. I cut the bottom piece the same width as the bag, and tall enough to cover the bottom and come up a little bit over the sides, plus seam allowance; 24″ x 11″
Handles
Cut four double the finished width (I wanted 1 ½” wide straps) plus 1” seam allowance by the height of the bag plus 8”. This is for the part of the handle that rises above the bag so you can slip your hand through, plus ½” seam allowance. Remember: each strap will join another so you are dividing the height of the extension in half and distributing it between two handle pieces (one side and the other side of the bag will hold the other two handle pieces) If you want to slip the bag over your shoulder make the extension longer. I decided on 8” from measuring the handle of the LLBean tote and adding an inch.
My handle pieces were cut from the same canvas as the bottom. I cut four strips 24″ long and 4″ wide. Next time I may make it 5″ wide for a sturdier looking handle. Just a thought. I purchased 1 yard of canvas.
Lining
I used quilting cotton but you could use just about anything including fabric that’s been laminated with vinyl for a pool and beach tote. Cut two pieces which need to be sewn together on three sides, unlike the exterior.
My lining was cut 24″ wide (same as the bag) by 20″ tall (the height of the exterior piece, divided in half and a 1/2″ seam allowance added for the bottom seam). Cut 2 of these pieces. I purchased 1 yard of lining fabric. It shrunk a lot in the wash but I had enough and used the piece left for the interior pocket.
Batting
Cut two pieces of thin, fusible batting the same size as your lining to give the bag a little structure and a certain kind of look that I am not sure how to describe. The batting is a choice and if you want to use stiff interfacing instead for the structure you can.
Interior pocket
I used the same fabric as the lining but you could get crazy or fancy and use any fabric here. You could also add more than one pocket and/or a fob to attach keys to.
I cut my pocket 18″ x 9″. You also need a zipper for the pocket. My pocket is 8″ wide and I bought a 9″ zipper.
Putting it together
Start with making the handles. See this tutorial on how to sew the handles.
The handles are currently four strips of fabric. They will be placed on the bag as four separate pieces, two on the front and two on the back, and joined together at the top. forming two handles; one handle on each side of the bag. This is important to know ahead of time because you want to be sure to leave 3 ½” of the long seam un-sewn, at one end. This open end allows you to sew two handle pieces together later with a clean finish.
Before you sew and turn them measure down from one short end 3 ½” and mark it. Start your needle when sewing the long seam at this mark and sew to the end.
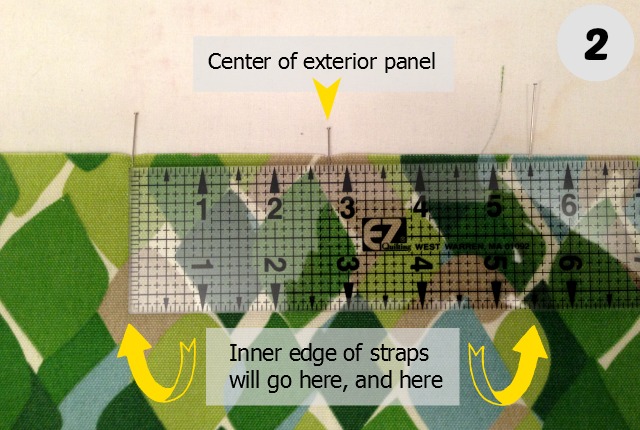
The handle placement on the bag is important. You want them symmetrical for balance when carrying things, sure, but mostly for looks. Start with folding the bag in half so the side seams are lined up. Press or thumb press to make a crease, mostly at the top edges. The crease marks where the center of the bag is. I placed a pin to mark and measure out 2 3/4″ from the center in each direction across the top edges and marked with pins. This is where the inside edge of the handles will lay.

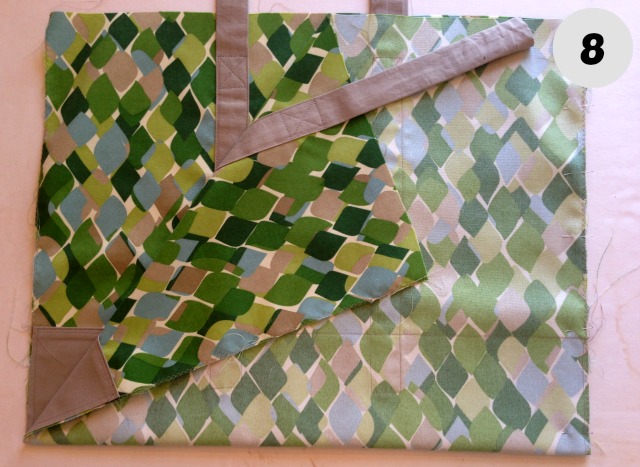
Place the handles, seam side down onto the bag. Two on each side. The handles are extending 8″ above the bag (the seam allowance of the bag’s top edge and the seam at the top of each handle piece (where the handles are joined together) negate each other so just place the handles above the top edge of your bag as high as you wanted the handle extension to be. For me, that’s 8″. Remember that the open end of the handle is the end that is extending beyond the bag’s top edge.
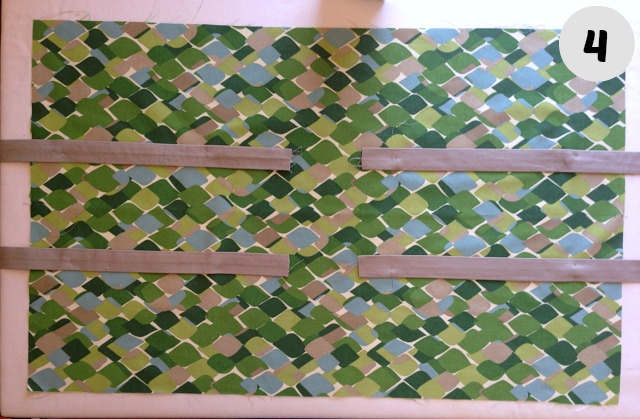
Check that the handles are straight by measuring in a few places. Do not worry about the unfinished bottom edge of the handle. It will be covered by the reinforcement bottom piece When all looks good to you, pin down.

Sew the handles in place. Do not sew all the way to the top edge, Back off at least an inch from the top to give room to sew the lining to the bag. I stopped sewing the handles to the bag 2″ down from the upper edge. Add extra reinforcement near the top of the handle with extra stitching. You could have a box with an X in it or just a box or even a floating box in between the edge stitching. It’s your choice.
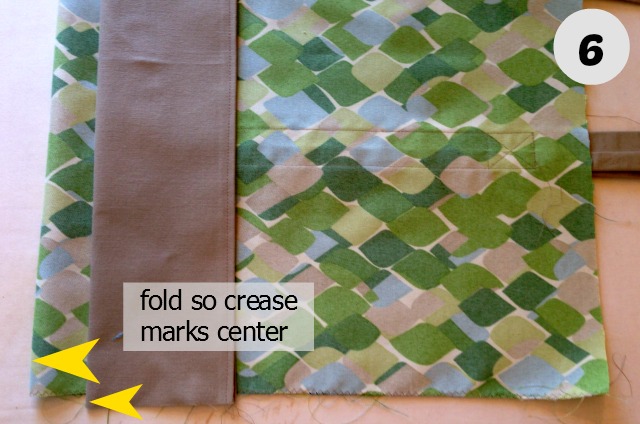
With the handles on but not joined together, I turned my attention to the bottom of the bag. Fold over the seam allowance (1/2″) on the long edges of the bottom reinforcement piece and press. You can see in the photo above I folded over the long edge and stitched it down. Later I discovered the stitching is unnecessary at this time. This long edge will be stitched onto the bag in the next step so there was no need to stitch it down to itself ahead of time.
Find the center of both the bottom of the bag and the reinforcement bottom piece by folding both of them in half. By pressing a crease with thumbs or an iron you now have a mark to line the two pieces up with. Like a notch, but a crease instead.
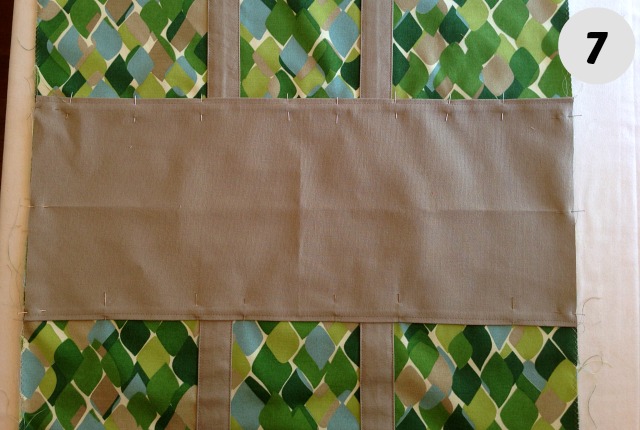
Place of the bottom piece on top of the bag, lining up those center creases you just made. Pin in place and stitch it down close to the edge. Stitch across the short edge too although that won’t be seen when done. You could use contrasting thread, do double or triple rows of topstitching and/or use heavier, decorative thread.
Fold the bag in half, right sides together, to match up the side seams. If you measured and pinned and sewed better than I did, your reinforcement piece should match up to itself on the side seam. If you did like me and they don’t match exactly, do not sweat. We’re going to cover up that boo-boo later.
Sew your side seams, clip the corner and press open.
This tote bag post has been broken up into readable chunks. The next post will close up the handle pieces to make them actual handles.
Then I’ll sew the bottom of the bag to give it dimension. After that, it’s the lining and its pocket. Then the lining is sewn to the bag and it’s all done.
Post In This Series
Prequel: How to make tote bag handles
Part 2: The Handles
Part 3: Making It Stand On Its Own
Part 4: The Lining
Part 5: Finishing It Up
Love it! Fantastic fabric choice. So much better than LL Bean 🙂